
Katniss Cowl-Thing: Phase 1
UPDATE 1/27/23: oh my god this thing...I horrendously undercharged for it. Talk about low-balling...jk jk I do NOT want to talk about it at all. Lord have mercy! Pricing is hard!
I did a pretty detailed pattern/tutorial for it.
Anyway, see what I've got available to buy from my Etsy shop! If you ended up on this page, you're probably looking for that pattern though, right?
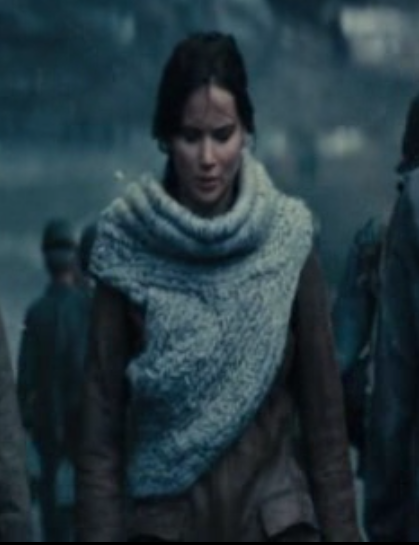

I got started on this mighty beast (the badass one-shoulder Katniss cowl-thing) yesterday and finished up the neck today. I worked the neck part based on this pattern. I'm really excited to start work on the shoulders tomorrow and I'm going to go in a completely different direction in a valiant attempt to even more closely mimic the weaving. This was (I hope) the most challenging part. By challenging I mean tedious. It was fun at first and then a few hours in I wanted to off myself.
Supplies So Far

- 5/16" polypropylene utility line (it is more lightweight and flexible imo)
- a lot of Lion Brand Super Bulky Hometown USA yarn in gray
- some packing tape (not pictured)
- size J crochet hook

The first thing I did was cut 3 strands of rope - 33", 47" and 45" - these are the top three big chunky parts of the neck going from top to bottom.
I'm either completely incompetent with the primitive task of using fire or polypropylene rope isn't normal. But I couldn't get the ends of this rope to burn properly and stop fraying. I was just burning off more and more rope. So it's a good thing I got 50' of it. I ended up just using packing tape to cover each piece (instead of duct tape because I didn't want the pieces to become too stiff).

 I made a circle with the 33" rope and then covered it with yarn by wrapping around then doing a slip stitch at the top and wrapping again. And again. And again. I then wrapped the other two pieces, which stayed rope-y and are not joined to make circles. This took approximately 500 years.
 I also had to make 4 end pieces for each end of the long ropes and secure them with more wrapping and slip stitches for another 100 years.
End Pieces
These are super similar to Engineered Creations' end pieces, but I had to make some changes to accommodate my super bulky yarn.
 Ch 4, join with sl to form loop, ch 1
5 sc in loop
Work even until the cap-thing is about 2" then leave your ends dangling because they really help when attaching these things to the rope!
I slid the ends on as far as they'd go then used the loose yarn to literally tie the ends to the rope. Then I did a super tight layer of wrapping and sl to cover as much of sc ends as possible to make the pieces look uniform. It was ok with me that they were lumpy - the original is lumpy as all hell.

I think began the astoundingly tedious task of attaching these pieces together to make the neck. I started attaching the first long piece (47") about 4" from its end. I used slip stitches to create a seam between the slip stitches already on each piece from the 500 years of wrapping. For placement purposes I used the outer loops of the circle pieces sl and the inner loops of the long pieces - if that makes any sense.
To attach the third piece of the neck I started with the shorter dangling end of the previous piece. I lined them up then carried on around in the same manner as before. As I went I took care of any loose ends (to avoid weaving in as much as possible) and I crocheted them into my slip stitches of my seam. Everyone hates weaving in ends. It's a drag.


After another 100 years, I finished attaching the third piece. I then took a picture of the form in the back then I threw it onto the floor and took another picture. Now I've put it all away and I can't wait to start on the rest, but I can't look at it for a while. I was going to crochet the whole thing, but now I may combine crochet and some fat (as well as phat) cables. I'll be making several parts then piecing them together and hopefully the end result will be satisfying to all humans involved. I may or may not work on this tomorrow because I need to work on my Zer0 sword omg. :D


Comments
Post a Comment